PXS Softwares - Business Solutions
Software Tutorial Lounge - The Learning Center.
Article Submitter Tool Article Submitter Instructions:
Step 1: Open the application.
Step 2: Register to the "Top Article Directories" list websites.
You need to register to the website first before you can publish your article:
To register:
1) Select a website in the "Top Article Directories" list.
2) Click Edit Accounts button.
3) Click Sign Up button. After you click Sign Up button, you will be redirected
to signup page of the website you have chosen.
Note: You can also register to their respective website directly.
Step 3: Save your every account details of the "Top Article Directories" website.
To save:
1) Click Edit Accounts button.
2) Under Edit Accounts window. Select the website that you would like to save in the drop down menu.
3) Enter your account username and password for that website.
4) Click Save button.
Step 4: Start preparing your article for publishing.
Once you're finish registering and saving you account details, you can now start
sending your articles to the respective "Top Article Directories" website
available in this software.
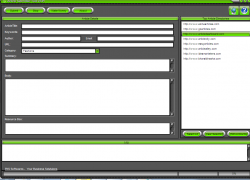
1) Enter your "Article Title".
2) Enter your "Keywords".
3) Enter the "Author" name of the article.
4) Enter you're desired "Email" address here.
5) Enter you're desired "URL" here.
6) Choose a "Category" in the drop down menu suitable for your article.
7) Enter your "Summary" of your article.
8) Enter your article in the "Body" field.
9) You can enter additional information at the "Resource Box" field.
Step 5: Choose a website that you like to submit your article:
1) Select a website in the "Article Details" section.
2) For multiple selections, hold ctrl key and click a website.
3) You can select the entire website by clicking the "Select All" button.
Step 6: Click "Submit" button to submit your article.
Note: You can check the "Log" column to check the status of your submitted Article.
Important Reminder: There are currently 8 free Top Article Website where you can publish your articles and register for free.
http://www.ezinearticles.com
For Registration: You will receive an email notification to activate your account.
For Publishing: The article is pending approval by the website administrator before your article will be published to the website.
http://www.goarticles.com
Note: Webmail providers such as Yahoo, Gmail, Hotmail and MSN commonly block GoArticles email verification and update messages and are no longer accepted. To register, please use a non-webmail address.
http://www.articledashboard.com
For Registration: You will receive an email notification to activate your account.
For Publishing: The article is pending approval by the website administrator before your article will be published to the website.
Note: The penname and author name must be the same.
http://www.articlecity.com
For Registration: You don't need to register on this website. It's free to submit article.
http://www.easyarticles.comhttp://www.articlealley.com
For Registration: You will receive an email notification to activate your account.
For Publishing: The article is pending approval by the website administrator before your article will be published to the website.
http://www.ideamarketers.com
Note: that if you use an AOL address you will NOT receive a welcome message, log in details or any updates from us regarding your account.
http://www.bharatbhasha.com
Step 1: Open the application.
Step 2: Register to the "Top Article Directories" list websites.
You need to register to the website first before you can publish your article:
To register:
1) Select a website in the "Top Article Directories" list.
2) Click Edit Accounts button.
3) Click Sign Up button. After you click Sign Up button, you will be redirected
to signup page of the website you have chosen.
Note: You can also register to their respective website directly.
Step 3: Save your every account details of the "Top Article Directories" website.
To save:
1) Click Edit Accounts button.
2) Under Edit Accounts window. Select the website that you would like to save in the drop down menu.
3) Enter your account username and password for that website.
4) Click Save button.
Step 4: Start preparing your article for publishing.
Once you're finish registering and saving you account details, you can now start
sending your articles to the respective "Top Article Directories" website
available in this software.
1) Enter your "Article Title".
2) Enter your "Keywords".
3) Enter the "Author" name of the article.
4) Enter you're desired "Email" address here.
5) Enter you're desired "URL" here.
6) Choose a "Category" in the drop down menu suitable for your article.
7) Enter your "Summary" of your article.
8) Enter your article in the "Body" field.
9) You can enter additional information at the "Resource Box" field.
Step 5: Choose a website that you like to submit your article:
1) Select a website in the "Article Details" section.
2) For multiple selections, hold ctrl key and click a website.
3) You can select the entire website by clicking the "Select All" button.
Step 6: Click "Submit" button to submit your article.
Note: You can check the "Log" column to check the status of your submitted Article.
Important Reminder: There are currently 8 free Top Article Website where you can publish your articles and register for free.
http://www.ezinearticles.com
For Registration: You will receive an email notification to activate your account.
For Publishing: The article is pending approval by the website administrator before your article will be published to the website.
http://www.goarticles.com
Note: Webmail providers such as Yahoo, Gmail, Hotmail and MSN commonly block GoArticles email verification and update messages and are no longer accepted. To register, please use a non-webmail address.
http://www.articledashboard.com
For Registration: You will receive an email notification to activate your account.
For Publishing: The article is pending approval by the website administrator before your article will be published to the website.
Note: The penname and author name must be the same.
http://www.articlecity.com
For Registration: You don't need to register on this website. It's free to submit article.
http://www.easyarticles.comhttp://www.articlealley.com
For Registration: You will receive an email notification to activate your account.
For Publishing: The article is pending approval by the website administrator before your article will be published to the website.
http://www.ideamarketers.com
Note: that if you use an AOL address you will NOT receive a welcome message, log in details or any updates from us regarding your account.
http://www.bharatbhasha.com
Project Management Software v2.01
Project Manager Tool Instructions
Project Creation Function: You can create a new project at the start of the program or choose to load an existing one.
1. Create a new project by clicking on ‘New Project’. Enter in your project name, expected start and end dates of the project and the priority category that the project falls under. Click on ‘Ok’ to create the project.
2. Your project will fall under the priority category it belongs to, which is under the ‘Projects’ panel found on the left hand side. Click on the project name to edit details and view tasks of the project.
3. You can add new tasks for the project by clicking on ‘Add New Task’ and enter enter the task description, task details/ notes and the start and end dates of the task. Click on ‘Save’ to save the task.
4. You can edit the content of existing tasks by selecting the ‘Edit Selected Tasks’.
5. You can select the tasks that you want to remove from the project by clicking on ‘Remove Selected Tasks’
6. When a task is completed, the checkbox next to the task should be clicked on and this will indicate the percentage of project completion.
7. You can make use of the ‘Calendar’ function to check dates and manage your daily schedule.
8. Click on ‘Save Changes’ to update your project listings, schedule and content.
.
